

Appearance
Project History and Versions
Each time someone synchronises the project from a mobile device or from QGIS through Mergin Maps QGIS plugin, a new project version will be created. Thus, it is possible to see the details of the changes made in Mergin Maps project by different users or devices.
Using the QGIS plugin or the dashboard, you can view what files have been added or removed. If you use GeoPackage for your survey, you can also see the list of the features which have been added, deleted or updated.
Project history in QGIS
Great tools to inspect the project history and compare changes between project versions can be found in the QGIS plugin:
- use Project history to explore changes in the Changes Viewer
- use Create report to get an overview of changes for a range of project versions.
- use Create diff to extract changes made between two versions of a layer
Project history in QGIS
Project history and version can be inspected using the Mergin Maps QGIS plugin by clicking the Project history button of the toolbar.
![]()
The button opens the Changes Viewer window. Here, all available project versions are listed in the left panel. By selecting a version you can inspect the changes between this and the previous project version (not the state of the project at that version). Note that older versions of your project can be downloaded through the dashboard.
On the right, you can see some information about the currently selection version: the project size, date of creation and Mergin Maps component that was used to create it. You can switch between the Changed layers and Changed files tabs.
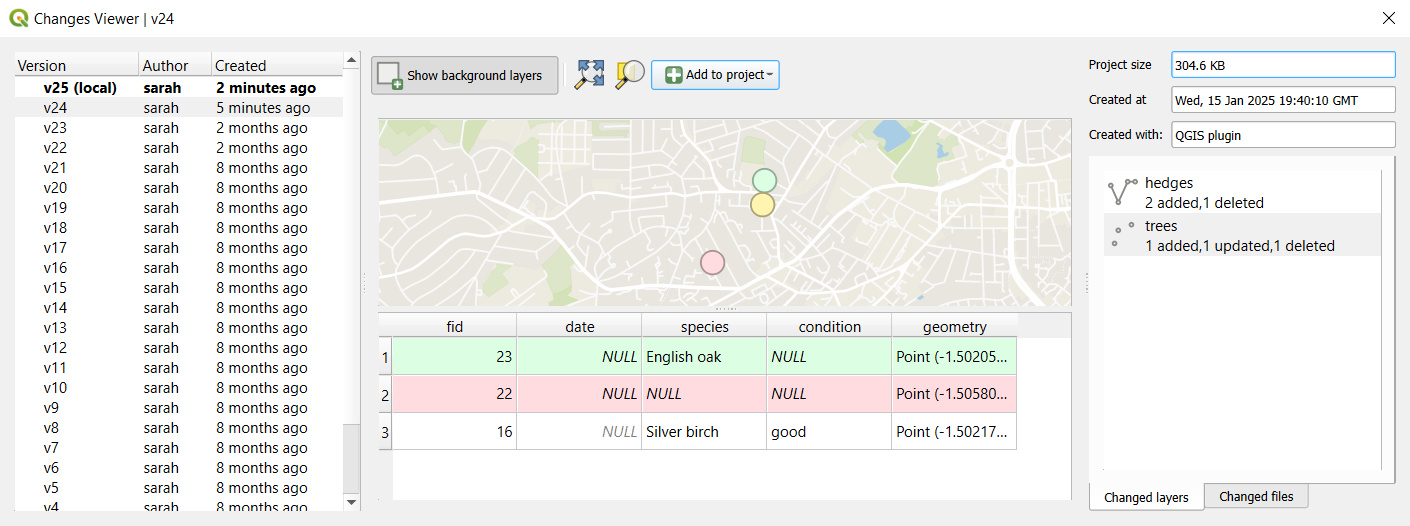
Select a layer from the list in the Changed layers tab to display its changes on the map along with a colour-coded attributes table (green for insert, yellow for update, red for delete).
Changes layers can be added to the project to inspect them further or use them to restore deleted or modified data.

Project history and advanced changelog on the dashboard
To see the project history:
Log in app.merginmaps.com and go to your project
Navigate to the History tab.
Here you can find all available versions of the project. These versions can be downloaded to your computer which can be helpful if you need to create a backup or restore previous version of the project.

Click on a version to see more details about what was changed.
You can inspect the list of added, edited and removed files.

For GeoPackage layers, there is an option to see even more. Click on Show advanced

Now you can see the overview of feature changes in a specific layer across all attributes.
Here, there are multiple changes in the
treeslayer. One feature (fid: 9) was added, one feature (fid: 6) was deleted.There are two modified features:
fid: 2was moved to a new position- For
fid: 8, the value of attributespecieswas changed

How to revert to an older version
You may find yourself in a situation where you want to revert to an older version of the project.
Local changes made in QGIS (changes that were not synchronised yet) can be reverted by using the Reset changes option in Project status.
To revert to an older version of a project (already synchronised to the cloud), follow these steps:
- Log in app.merginmaps.com and go to your project
- Navigate to the project history and find the version you want to use
- Download the project version to your computer. Open the project in QGIS to make sure it is the version you want to restore.
TIP
Our blog Downloading a previous version of your project contains detailed steps on how to download projects that are too large to be downloaded from the dashboard.
Now you have multiple options:
Package the downloaded project version as a new Mergin Maps project. You can keep both projects if needed or delete the one you don't need anymore.
or Replace the specific files in your Mergin Maps project folder:
Close QGIS
Copy the QGIS project (
.qgz), the data (.gpkg) or both from the downloaded older version and paste them to your current Mergin Maps project folder.Be careful when doing this!
If you changed the data schema between your versions, this might be a bit tricky. By replacing the QGIS project file, you will revert the project settings, such as symbology, forms settings, relations, etc. By replacing the data files, you will get the content that was saved in the downloaded version of the project.
Open the project in QGIS and check if you restored your project successfully. If needed, modify the project settings so that everything works as intended.
If you are happy with the result, synchronise the changes. The restored version is now the current version of your project.